
Ever lined up a flawless fighting game combo, only for your character to stand completely still? You mashed the keys perfectly. Your brain reacted in time. But your hardware betrayed you. This phenomenon is infuriating, and it happens to the best of us. Often, we immediately blame cheap switches or faulty wiring. But the real enemy is usually hiding right underneath your keycaps.
Let’s talk about the nightmare of missed inputs. When you fail to clean a mechanical keyboard, ghosting and key chatter become inevitable. Microscopic debris fundamentally alters how your switches communicate with your PC. We are going to tear down your board, rip out the grime, and restore that factory-fresh actuation.
The Anatomy of a Missed Keystroke
Hardware Limits vs. Physical Grime
True ghosting is technically a hardware limitation where a keyboard cannot process simultaneous inputs. Cheaper office boards suffer from this constantly. However, modern gaming decks feature N-key rollover to prevent this exact issue. So why are your keystrokes still vanishing into thin air? The answer is physical obstruction. Over months of heavy use, dead skin, pet hair, and snack crumbs migrate deep into the switch housings.
This debris acts as a physical barrier. It literally prevents the metal contacts inside your mechanical switches from touching. You press the key down, feeling the tactile bump, but the electrical circuit never actually closes. I once dismantled a malfunctioning high-end Cherry MX board for a client, fully expecting to solder on new switches. Instead, I found a single, stubbornly lodged eyelash blocking the actuation leaf of the ‘W’ key.
It is a frustratingly simple problem masquerading as a hardware failure. Before you throw a $150 peripheral in the trash, you need to execute a deep clean. Removing this buildup is the only guaranteed way to clean a mechanical keyboard and prevent ghosting permanently. Let’s gather the right tools and prep your workspace.
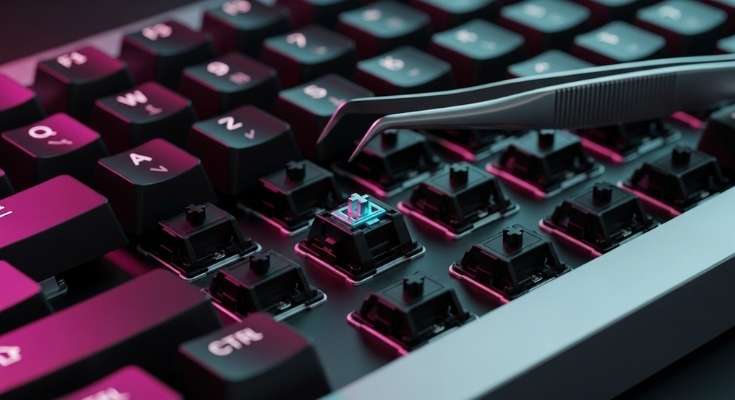
The Deep Clean Protocol
Stripping the Board Safely
Do not just rip your keycaps off with your bare fingers. That is a fantastic way to snap the fragile plastic stems entirely. Invest five dollars in a proper wire keycap puller. Wiggle it gently, pull straight up, and drop the caps into a bowl of warm, soapy water. While those soak, grab a can of compressed air.
Take your naked keyboard outside. Give it a few blasts of air at a 45-degree angle. You will be absolutely horrified by the thick cloud of dust that erupts from the aluminum backplate. Once the loose debris is gone, the real surgical work begins. Grab a bundle of precision Q-tips and a bottle of 99% isopropyl alcohol. Lower concentrations contain too much water and risk shorting your printed circuit board (PCB).
Dip a Q-tip into the alcohol and meticulously scrub the spaces between every single switch. Pay special attention to the stabilizers under your spacebar and shift keys. These areas are massive dirt magnets and directly contribute to that sluggish, mushy feeling during heavy gaming sessions.
Switch Maintenance for Flawless Actuation
Clearing the Stems and Contacts
Now we target the switches themselves. If you have a hot-swappable board, pull the problematic switches out completely. This allows you to inspect the delicate copper pins for corrosion or bending. For soldered boards, you have to work from the top down. Depress the switch stem with a plastic spudger and use an alcohol-soaked brush to clean the inner housing walls.
This step is absolutely critical to clean mechanical keyboard ghosting issues at the source. Sticky residue on the switch stem heavily delays the spring’s return rate. If the switch doesn’t reset instantly, your next rapid-fire keystroke won’t register at all. It mimics ghosting perfectly, driving competitive gamers insane. I highly recommend using a specialized electronic contact cleaner for severely unresponsive keys.
A quick spray directly into the depressed switch housing dissolves stubborn oils instantly. Just ensure the board is completely unplugged and dry before routing power back to it. Never rush this drying process. Leave the board completely bare in a well-ventilated room for at least four hours before snapping the keycaps back on.
Preventing Future Keystroke Failures
Building Better Desk Habits
Cleaning your gear is exhausting. Preventing the mess in the first place is incredibly easy. The absolute golden rule of peripheral maintenance is simple: stop eating at your desk. A single rogue potato chip crumb can instantly ruin a $2 premium mechanical switch. Keep your snacks on a separate side table.
If you have pets, you are fighting a losing battle against shedding. Cat hair is notoriously insidious, finding its way perfectly into tight switch crevices. Buy a cheap, clear acrylic dust cover. Slap it over your board every single night when you shut your rig down. This ten-second habit easily extends the lifespan of your gaming deck by years.
Finally, invest in a soft-bristled drafting brush. Keep it right next to your monitor. Give your keyboard a quick five-second sweep every morning before you boot up. Brushing away the surface dust daily prevents it from migrating deep into the hardware housing, where it causes actual electrical disruption.
Reclaim Your Responsiveness
A premium gaming keyboard is an expensive investment, and treating it like a dining plate will destroy it. Ghosting and dropped inputs are rarely permanent hardware deaths. They are simply desperate cries for basic maintenance. Tear that board down, scrub the PCB, and clear those delicate electrical contacts. You will instantly reclaim that snappy, perfectly responsive typing experience you originally paid for.
Grab your wire keycap puller this weekend and rescue your setup from the grime. Have a specific switch that still refuses to register even after a deep clean? Drop the brand and model in the comments below, and we will help you diagnose the electrical fault!
FAQ
Can I put my mechanical keyboard in the dishwasher?
Absolutely not. While some older membrane keyboards could survive this, the intricate metal contacts and exposed PCBs of a mechanical keyboard will instantly short out and rust. Water and dish detergent will permanently destroy your expensive switches.
How often should I deep clean my mechanical keyboard?
If you use your computer daily, you should aim for a deep clean every three to six months. However, if you eat at your desk or have heavy-shedding pets, you may need to increase this frequency to every two months to prevent switch failure.
Why is my spacebar still sticky after cleaning the switches?
Your keyboard stabilizers likely need attention. The metal wires and plastic housings that support large keys often lose their factory lubrication over time or get clogged with thick dust. You will need to carefully remove the stabilizers, clean them with alcohol, and reapply a specialized dielectric grease.